What Are Specializations?
A small set of items sit outside the normal weapon and gear categories — they're tied to a specific class and built around one job rather than general combat. Launchers, the Hammer line, Equipment, Recon, Repair Tools, and the Defibrillator all fall into this group. Prices and unlock levels below are current for Season 02 / Update 0.2.0. Price is what you pay each time you bring an item into a match; the unlock is the class level plus a one-time cash cost.
Launchers
Support-class anti-vehicle, anti-air and anti-infantry weapons. Each fires one fixed payload, and only the RPG-7 takes an attachment.
Hammers
Support-class build tools used to construct and upgrade a Forward Operating Base.
Equipment
A shared specialization slot — Remote Detonator, Fuel Can, and Halligan Bar.
Recon
Spotting equipment — Monocular, Range Finder, Binoculars, and Infrared Range Finder.
Repair Tools
Vehicle repair tools — manual Wrenches and the battery-powered Light and Heavy Drills. Repair XP goes to Driver or Pilot depending on the vehicle.
Defibrillator
A battery-powered Medic-class tool that revives teammates instantly.
Launchers
All reward Support XP and go in the Specialist slot. Each fires one fixed payload type, and the RPG-7 is the only one that takes an attachment: the PGO-7 sight (Support Lvl 12, $10,000).
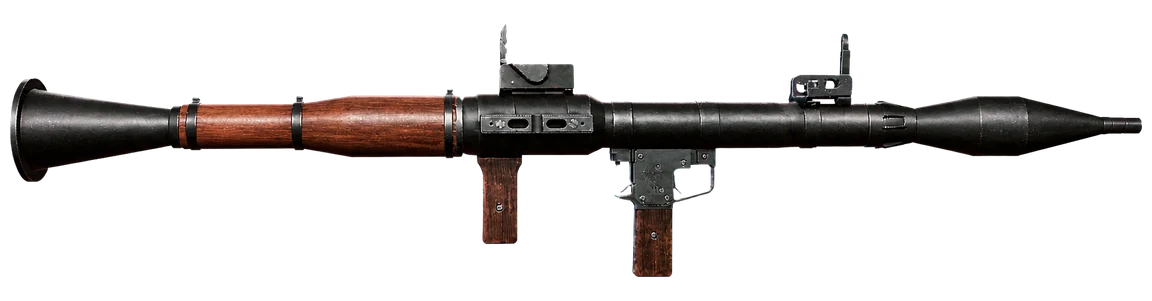
RPG-7
- RPM
- 100
- Weight
- 6.3kg
- Price
- $1,800
- Support Level
- Support Lvl 6
- Unlock Price
- $30,000
- Payload
- 93mm Self-Propelled Rocket
- Launch Tube
- Reusable
- Special
- —
9K333 Verba
- RPM
- 100
- Weight
- 17.25kg
- Price
- $800
- Support Level
- Support Lvl 14
- Unlock Price
- $50,000
- Payload
- 72mm Anti-Air Missile
- Launch Tube
- Single-Use
- Special
- Requires Lock On
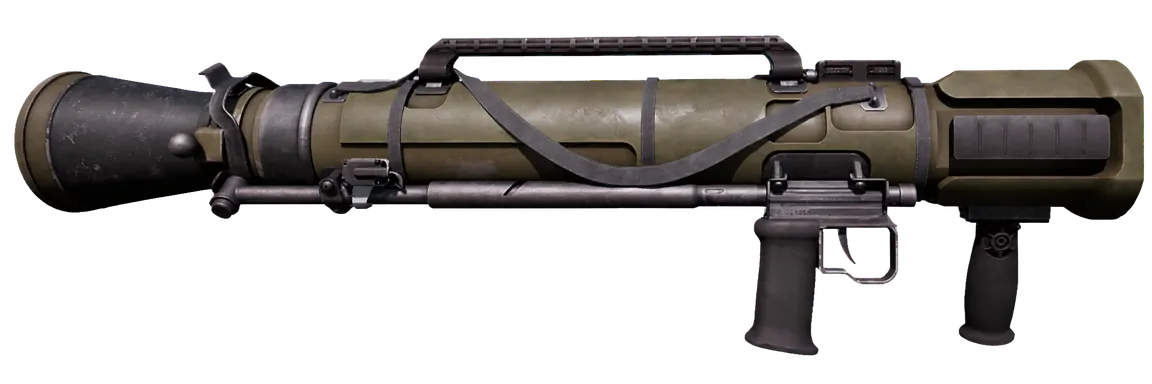
MAAWS
- RPM
- 100
- Weight
- 7kg
- Price
- $2,400
- Support Level
- Support Lvl 18
- Unlock Price
- $100,000
- Payload
- 84mm Anti-Tank Shell
- Launch Tube
- Reusable
- Special
- —
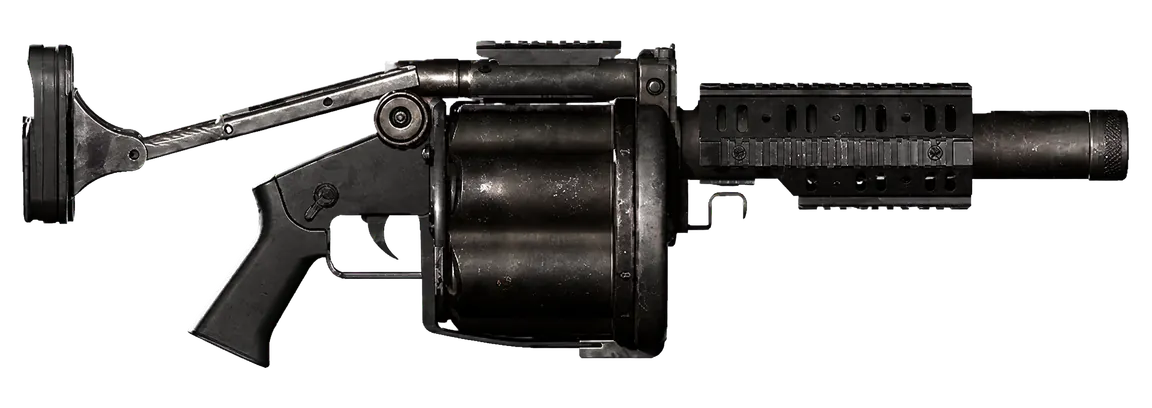
MGL-40
- RPM
- 75
- Weight
- 5.3kg
- Price
- $7,500
- Support Level
- Support Lvl 35
- Unlock Price
- $250,000
- Payload
- 40mm Grenade Shells
- Launch Tube
- 6-Shot
- Special
- —
Hammers
Three tiers, all Support-class build tools, equipped from the Items category, and all three spend Build Supplies. Each higher tier unlocks more buildable structures. The Small and Medium Hammer spawn in every FOB’s starting inventory; the Large Hammer is the one that builds everything, including the AA, mortars, the sturdiest walls, the MG Nest, and the Refuel and Repair Stations — see Deployables for how an FOB works. Hitting a structure’s critical spots gives a build bonus. Hammers can’t breach doors or gates — that’s the Halligan Bar’s job.
| Item | Weight | Price | Unlock | Notes |
|---|---|---|---|---|
| Small Hammer | 0.32kg | $100 | Default | Lowest tier. Builds a smaller set of structures than the Medium or Large Hammer, including the Wooden Step. |
| Medium Hammer | 1.23kg | $800 | Support 3, $25,000 | Middle tier. Builds more structures than the Small Hammer and fewer than the Large, including the Large Shelter. Contributes less per swing than the Large Hammer. |
| Large Hammer | 3.18kg | $2,400 | Support 8, $75,000 | Builds and repairs ALL buildables, at the fastest build speed — the only hammer that builds the MG Nest. |
Build Supply Costs
Costs are in Build Supplies, drawn from the FOB’s stockpile. The destroy reward is the cash an enemy earns for destroying it, paid as Assault XP at roughly 25% of the cash, and it scales with how built the structure is. Exact per-swing build numbers aren’t published, and which structures the Small and Medium Hammers can build isn’t fully confirmed.
| Buildable | Build Supplies | Destroy Reward | Notes |
|---|---|---|---|
| Wood Base | 15 | $15 | Foundations fit against slopes, stairs and walls. |
| Wooden Step | — | — | Small Hammer and above. Cost not listed. |
| Bremmer Wall | 32 | — | Barbed wire and sandbags can be placed on top. |
| Door | 80 | $100 | Breachable only with the Halligan Bar. Closing a friendly FOB door pays $75. |
| Gate | 200 | $200 | Breachable only with the Halligan Bar. |
| Air Raid Shelter, Bunker, Crow's Nest | 200 | — | — |
| Large Shelter | 250 | $250 | Medium Hammer and above. Covers key assets or keeps the rain off. |
| L81 Mortar | 600 | $650 | Large Hammer. Each shell costs 150 Ammo Supplies, and the player drops each shell into the tube, which limits the fire rate. |
| Stingray | 650 | $650 | Stationary emplacement. |
| MG Nest | 650 | $650 | Large Hammer only. Manned M2 Browning; 200 Ammo Supplies per refill of 60 rounds. |
| Talon 9K-SAM | 650 | $650 | Anti-air missile station. 5s reload; each missile costs 200 Ammo Supplies. |
| Vanguard CIWS | 1,200 | $1,200 | Shreds light cover, struggles against heavy fortifications. |
| Hot Zone Magnet | 2,750 | $2,750 | — |
| Repair / Refuel Station | — | $200 | Large Hammer. See FOB Stations below. |
Unfinished buildables collapse as soon as they lose a support, tank traps only place on a defined set of surfaces, and barbed wire doesn’t pay cash or XP on kills. The patch notes list the L81 Mortar’s and the Door’s destroy rewards above their build cost, so treat those two as unconfirmed. Drill Rig fuel and uptime are on Drills.
Supplies & FOB Stations
Refuel Station
Large Hammer build at an FOB. Refuels vehicles, drawing from the FOB's Fuel Supplies.
Repair Station
Large Hammer build at an FOB. Repairs vehicles, drawing from the FOB's Mechanical Supplies — separate from the handheld Repair Tools.
Getting Supplies In
Buy them straight from the FOB ($10 per unit of Build, Fuel, Ammo or Mechanical Supplies), buy from a small crate, or drop a supply crate inside the FOB's radius (the blue square on the map). Capturing a dropped crate as infantry inside your FOB radius sends its supplies straight into the FOB.
Supply Pallets
Large pallets of 1,800 supplies, $400 each. The Build Supply Pallet is unlocked by default; the Mechanical (WARDOG Lvl 5, $10,000), Ammo (Lvl 9, $25,000) and Fuel (Lvl 16, $50,000) Supply Pallets are WARDOG unlocks. Deploying one pays $1,250 and 400 XP (500 XP from a ground vehicle), plus +$250 / +100 XP per pallet in a row, up to 10.
Equipment
A specialization inventory slot shared by three items, separate from hammers and repair tools. The Remote Detonator and the C4 Charge both unlock at Assault Lvl 4.
| Item | Weight | Price | Unlock | Notes |
|---|---|---|---|---|
| Remote Detonator | 0.02kg | $650 | Assault 4, $15,000 | Detonates placed C4 Charges from a safe position. Requires a C4 Charge already placed. C4 kills pay Assault XP. Explosives can’t be used from enclosed vehicle seats. |
| Fuel Can | 5kg | $150 | Default | Carryable fuel for the Specialist or Secondary slot. Separate from the FOB’s own Fuel Supplies stockpile. |
| Halligan Bar | 2.8kg | $885 | Default | The breaching tool — opens both doors and gates, which hammers can’t. 7 uses. Pays $100 per door breached, once per door. |
Recon
Spotting equipment. All four grant Recon XP for a Spot Assist when a teammate kills your spotted target — see Income By Class. Owning a sniper rifle isn’t required to make use of any of these. Spotting rewards scale with the value of the vehicle variant, buildable or crate spotted, a target destroyed by an enemy faction pays 25% of the reward, and rain shortens spotting range. The Spot Assist XP amount itself isn’t confirmed yet.
| Item | Weight | Price | Unlock | Notes |
|---|---|---|---|---|
| Binoculars | 0.3kg | $180 | Default | Spotting equipment. |
| Monocular | 0.28kg | $350 | Recon 2, $7,500 | Spots enemy infantry and vehicles. Medium variable magnification. |
| Range Finder | 0.23kg | $1,450 | Recon 8, $25,000 | Spots enemy infantry and vehicles. High variable magnification, plus an accurate distance readout. |
| Infrared Range Finder | 0.43kg | $3,200 | Recon 32, $50,000 | Spotting equipment. Runs on batteries — about 80s of active use per battery, draining faster if toggled on and off quickly. What the infrared adds isn’t documented. |
Repair Tools
Vehicle repair tools. They unlock on the Support track, but repair XP goes to Driver or Pilot depending on the vehicle being repaired. Wrenches spawn in every FOB's starting inventory — see Deployables for the FOB's separate, stationary Repair Station.
| Item | Weight | Price | Unlock | Notes |
|---|---|---|---|---|
| Wrenches | — | $180 | Default | Baseline manual repair tool. No batteries. Called “Wrench” in game. |
| Light Drill | 1.5kg | $600 | Support 1, $10,000 | Battery-powered, faster repair speed than Wrenches. Requires Batteries to use. |
| Heavy Drill | 6.9kg | $1,300 | Support 28, $50,000 | Battery-powered, the heavier sibling of the Light Drill. How much faster it repairs isn’t documented. |
Both drills run on the same power source as the Defibrillator: Battery and High Capacity Battery, below.
Batteries
The power source for every battery-driven tool: the Light Drill, Heavy Drill, Infrared Range Finder and Defibrillator, which reads "Requires Battery to Charge & Use" on its own vendor card. A standard Battery gives the Infrared Range Finder roughly 80s of active use. The High Capacity Battery is the higher-capacity variant; how much longer it lasts isn’t documented.
| Item | Weight | Price | Unlock |
|---|---|---|---|
| Battery | 0.63kg | $150 | Default |
| High Capacity Battery | 2kg | $300 | WARDOG 46, $50,000 |
Defibrillator
Medic-class revive tool. Weight 2.6kg, Price $1,600, unlocks at Medic Lvl 22 for an additional $110,000. Revives teammates instantly and goes in the Specialist or Secondary slot. Requires a Battery or High Capacity Battery to charge and use. Full breakdown alongside the Field Resuscitator and Medical Bag on the Medical page.